Contents
Outline
I try to configure new development environment from scratch on Mac. The blog post list below is about how to set the development environment manually before.
- Development Environment on Mac(1) - iTerm & zsh
- Development Environment on Mac(2) - for tools
- Development Environment on Mac(3) - for development
In this blog post, I will introduce how to make an automatic configuration of the development environment with Homebrew and Shell script for more easily to configure the development environment on Mac.
Development environment structure
The list below is what I use for developing now.
- git-flow
- mysql 5.7
- python3
- node
- watchman
- php
- zsh
- oh my zsh
- ruby
- ngrok
- jdk
- android studio
- sequel pro
- db browser for sqlite
- mysql workbrench
- sketchapp
- postman
- sourcetree
- chrome
- iterm2
- xcode
- LINE
- KakaoTalk
- Slack
- Trello
- react native
- laravel
- jekyll
Let’s see how to make this list to the automatic configuration with Homebrew and Shell script.
Brewfile
You can use Homebrew to download automatically the tools what you want to use. Brewfile is the file that defines the tools you want to download automatically via Homebrew. To make Brewfile that includes your current tools on Mac, execute the command below.
brew bundle dump
When I checked Brewfile created by this command, this doesn’t include every tools. So, I made Brewfile that I added the tools what I want to use.
brew "mas"
brew "git-flow"
brew "[email protected]"
brew "python3"
brew "node"
brew "watchman"
brew "php"
# zsh is default in MacOS Catalina
# brew "zsh"
brew "ruby"

mas "LINE", id: 539883307
mas "KakaoTalk", id: 869223134
mas "Slack", id: 803453959
mas "Trello", id: 1278508951

cask "ngrok"
tap "adoptopenjdk/openjdk"
cask "adoptopenjdk8"
cask "android-studio"
cask "sequel-pro"
cask "db-browser-for-sqlite"
cask "mysqlworkbench"
cask "sketch"
cask "postman"
cask "sourcetree"
cask "google-chrome"
cask "iterm2"
Let’s see more details about how to define the tools like above.
brew
we can use brew "node" if the tools can be download officially via Homebrew. If you don’t know exactly tool name, you can execute the command below to search it.
brew search node
And then, you can see the result like below.
==> Formulae
heroku/brew/heroku-node        libbitcoin-node                node                           node@10                        node_exporter                  nodeenv
leafnode                       llnode                         node-build                     node@8                         nodebrew                       nodenv

==> Casks
nodebox                                                        nodeclipse                                                     soundnode
as you see the result, you can see Formulae and Casks list. the tools that are officially supported by Homebrew are in Formula List. writing them in Brewfile like below, you can download all by one command later.
brew "mas"
brew "git-flow"
brew "[email protected]"
brew "python3"
brew "node"
brew "watchman"
brew "php"
# zsh is default in MacOS Catalina
# brew "zsh"
brew "ruby"
cask
So What is Casks? Casks are the tools that you can download via Homebrew but Homebrew doesn’t support them officially. In other words, using Casks via Homebrew, you can download the tools that you downloaded usually from the web.
For example, Google’s Chrome is not supported by Homebrew officially, but you can download it via Homebrew Casks.
brew search chrome
execute the command above, you can see the result like below.
==> Formulae
chrome-cli                                                                                     chrome-export

==> Casks
chrome-devtools                                dmm-player-for-chrome                          mkchromecast                                   homebrew/cask-versions/google-chrome-dev
chrome-remote-desktop-host                     epichrome                                      homebrew/cask-versions/google-chrome-beta
chromedriver                                   google-chrome                                  homebrew/cask-versions/google-chrome-canary
In the list, google-chrome is Chrome browser what we use usually. We can install it via Homebrew command like below.
brew cask install google-chrome
Writing them in Brewfile with Casks like below, we can download them via Homebrew.
cask "ngrok"
tap "adoptopenjdk/openjdk"
cask "adoptopenjdk8"
cask "android-studio"
cask "sequel-pro"
cask "db-browser-for-sqlite"
cask "mysqlworkbench"
cask "sketch"
cask "postman"
cask "sourcetree"
cask "google-chrome"
cask "iterm2"
mas
If the tools are in Mac’s App store, What do we do? In this case, we can use Homebrew to download them too. To download the tools exist in App store, we should use Homebrew’s mas to download them.
Execute the command below to install mas.
brew install mas
After installing mas, you can search the tools that you can download from App store via the command below.
mas search xcode
When you search xcode like above, you can see the result like below.
 497799835  Xcode                                                                (11.1)
1183412116  Swiftify for Xcode                                                   (5.1)
...
And then, you can download it using the command below.
mas install 497799835
Write the tools that you can download via mas in Brewfile like below.
mas "LINE", id: 539883307
mas "KakaoTalk", id: 869223134
mas "Slack", id: 803453959
mas "Trello", id: 1278508951
Of course, we can’t download them without mas, so write mas installation like below on the top of Brewfile.
brew "mas"
...
we can install all tools in Brewfile via the command below.
brew bundle --file=./Brewfile
This command requires Homebrew installed on Mac. Let’s make Shell script to install Homebrew and configure the tools.
Shell Script
We can easily install the tools by using Brewfile. However, we need Shell script not only to install but also to configure them.
Install Homebrew and Brewfile
First, create ./install.sh and modify it like below to install Homebrew, and install the tools in Brewfile.
# !/bin/bash

# install brew
/usr/bin/ruby -e "$(curl -fsSL https://raw.githubusercontent.com/Homebrew/install/master/install)"

# install via brew
brew bundle --file=./Brewfile
And you can execute the command below to execute them.
./install.sh
Security & Privacy
The tools downloaded by Casks are same as the tools downloaded from Web so when you execute them, they are not executed immediately because of Security. In this case, usually we click Allow... button on System Preferences > Security & Privacy to execute them.
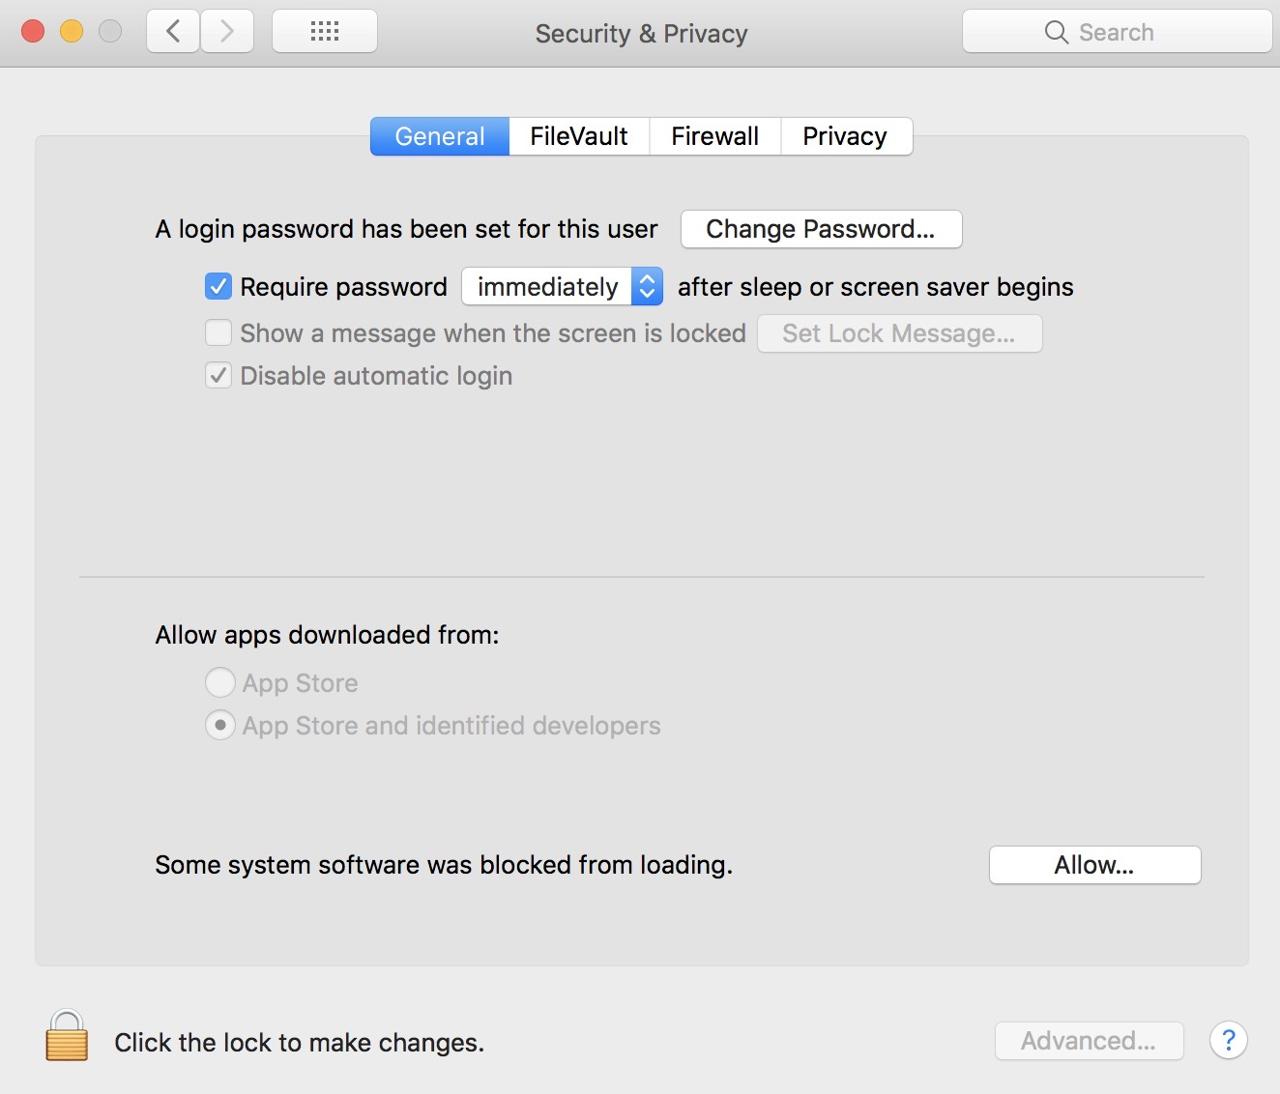
In this case, also we can use the command to allow them like below.
# sudo xattr -dr com.apple.quarantine /Applications/[App name]
sudo xattr -dr com.apple.quarantine /Applications/Sourcetree.app
And we can open the tools by executing the command below.
# open /Applications/[App name]
open /Applications/Sourcetree.app
write these commands in ./install.sh like below.
...
sudo xattr -dr com.apple.quarantine /Applications/Sequel\ Pro.app
open /Applications/Sequel\ Pro.app
sudo xattr -dr com.apple.quarantine /Applications/DB\ Browser\ for\ SQLite.app
open /Applications/DB\ Browser\ for\ SQLite.app
sudo xattr -dr com.apple.quarantine /Applications/MySQLWorkbench.app
open /Applications/MySQLWorkbench.app
sudo xattr -dr com.apple.quarantine /Applications/Sketch.app
open /Applications/Sketch.app
sudo xattr -dr com.apple.quarantine /Applications/Postman.app
open /Applications/Postman.app
sudo xattr -dr com.apple.quarantine /Applications/Sourcetree.app
open /Applications/Sourcetree.app
sudo xattr -dr com.apple.quarantine /Applications/Google\ Chrome.app
open /Applications/Google\ Chrome.app
sudo xattr -dr com.apple.quarantine /Applications/Android\ Studio.app
open /Applications/Android\ Studio.app
sudo xattr -dr com.apple.quarantine /Applications/iTerm.app
open /Applications/iTerm.app
the reason that I use the open command is to keep the tools in Dock of Mac.
Fonts
To use D2coding font for source code font in VSCode and Meslo LG M Regular for Powerline font for zsh and iTerm2, I downloaded and copy them to ./fonts/ folder.
To install the pre-downloaded font on the new Mac, execute the copy command below.
...
cp -a ./fonts/. ~/Library/Fonts
Add this command to ./install.sh file.
zsh
Create ./zsh/ folder to save zsh configuration. Create ./zsh/install.sh file and modify it like below.
sh -c "$(curl -fsSL https://raw.githubusercontent.com/robbyrussell/oh-my-zsh/master/tools/install.sh)"
This command is to install oh my zsh.
And then, copy the current settings file(~/.zshrc) to ./zsh/ folder. the content below is my current configuration of oh my zsh.
# If you come from bash you might have to change your $PATH.
export PATH=$HOME/bin:/usr/local/bin:$PATH

# Path to your oh-my-zsh installation.
export ZSH="$HOME/.oh-my-zsh"

# Set name of the theme to load --- if set to "random", it will
# load a random theme each time oh-my-zsh is loaded, in which case,
# to know which specific one was loaded, run: echo $RANDOM_THEME
# See https://github.com/robbyrussell/oh-my-zsh/wiki/Themes
ZSH_THEME="powerlevel10k/powerlevel10k"

# Set list of themes to pick from when loading at random
# Setting this variable when ZSH_THEME=random will cause zsh to load
# a theme from this variable instead of looking in ~/.oh-my-zsh/themes/
# If set to an empty array, this variable will have no effect.
# ZSH_THEME_RANDOM_CANDIDATES=( "robbyrussell" "agnoster" )

# Uncomment the following line to use case-sensitive completion.
# CASE_SENSITIVE="true"

# Uncomment the following line to use hyphen-insensitive completion.
# Case-sensitive completion must be off. _ and - will be interchangeable.
# HYPHEN_INSENSITIVE="true"

# Uncomment the following line to disable bi-weekly auto-update checks.
# DISABLE_AUTO_UPDATE="true"

# Uncomment the following line to change how often to auto-update (in days).
# export UPDATE_ZSH_DAYS=13

# Uncomment the following line to disable colors in ls.
# DISABLE_LS_COLORS="true"

# Uncomment the following line to disable auto-setting terminal title.
# DISABLE_AUTO_TITLE="true"

# Uncomment the following line to enable command auto-correction.
# ENABLE_CORRECTION="true"

# Uncomment the following line to display red dots whilst waiting for completion.
# COMPLETION_WAITING_DOTS="true"

# Uncomment the following line if you want to disable marking untracked files
# under VCS as dirty. This makes repository status check for large repositories
# much, much faster.
# DISABLE_UNTRACKED_FILES_DIRTY="true"

# Uncomment the following line if you want to change the command execution time
# stamp shown in the history command output.
# You can set one of the optional three formats:
# "mm/dd/yyyy"|"dd.mm.yyyy"|"yyyy-mm-dd"
# or set a custom format using the strftime function format specifications,
# see 'man strftime' for details.
# HIST_STAMPS="mm/dd/yyyy"

# Would you like to use another custom folder than $ZSH/custom?
# ZSH_CUSTOM=/path/to/new-custom-folder

# Which plugins would you like to load?
# Standard plugins can be found in ~/.oh-my-zsh/plugins/*
# Custom plugins may be added to ~/.oh-my-zsh/custom/plugins/
# Example format: plugins=(rails git textmate ruby lighthouse)
# Add wisely, as too many plugins slow down shell startup.
plugins=(git)

# python virtualenv
plugins=(virtualenv)

source $ZSH/oh-my-zsh.sh

# User configuration

# export MANPATH="/usr/local/man:$MANPATH"

# You may need to manually set your language environment
# export LANG=en_US.UTF-8

# Preferred editor for local and remote sessions
# if [[ -n $SSH_CONNECTION ]]; then
#   export EDITOR='vim'
# else
#   export EDITOR='mvim'
# fi

# Compilation flags
# export ARCHFLAGS="-arch x86_64"

# ssh
# export SSH_KEY_PATH="~/.ssh/rsa_id"

# Set personal aliases, overriding those provided by oh-my-zsh libs,
# plugins, and themes. Aliases can be placed here, though oh-my-zsh
# users are encouraged to define aliases within the ZSH_CUSTOM folder.
# For a full list of active aliases, run `alias`.
#
# Example aliases
# alias zshconfig="mate ~/.zshrc"
# alias ohmyzsh="mate ~/.oh-my-zsh"

# remove user name in zsh
# prompt_context(){}
POWERLEVEL9K_LEFT_PROMPT_ELEMENTS=(virtualenv dir_writable dir vcs)
POWERLEVEL9K_RIGHT_PROMPT_ELEMENTS=(status time battery)

# vscode code command
export PATH="$PATH:/Applications/Visual Studio Code.app/Contents/Resources/app/bin"
# brew path
export PATH=/usr/local/bin:/usr/local/sbin:$PATH
# python3 default
alias python=python3
alias pip=pip3
# composer
alias composer="php /usr/local/bin/composer.phar"
# Laravel
export PATH="$HOME/.composer/vendor/bin:$PATH"
# mysql
export PATH="/usr/local/opt/[email protected]/bin:$PATH"
# jekyll
export GEM_HOME=$HOME/gems
export PATH=$HOME/gems/bin:$PATH
# Android path for React Native
export ANDROID_HOME=$HOME/Library/Android/sdk
export PATH=$PATH:$ANDROID_HOME/emulator
export PATH=$PATH:$ANDROID_HOME/tools
export PATH=$PATH:$ANDROID_HOME/tools/bin
export PATH=$PATH:$ANDROID_HOME/platform-tools
To copy this file, add the command below to ./zsh/install.sh file.
...
cp ./zsh/.zshrc ~/.zshrc
Lastly, add the command below for installing zsh theme to ./zsh/install.sh file.
...
git clone https://github.com/romkatv/powerlevel10k.git /Users/$USER/.oh-my-zsh/themes/powerlevel10k
The completed ./zsh/install.sh is as below.
# !/bin/bash

#install oh my zsh
sh -c "$(curl -fsSL https://raw.githubusercontent.com/robbyrussell/oh-my-zsh/master/tools/install.sh)"

# copy my zsh settings
cp ./zsh/.zshrc ~/.zshrc

# install zsh theme
git clone https://github.com/romkatv/powerlevel10k.git /Users/$USER/.oh-my-zsh/themes/powerlevel10k
To execute ./zsh/install.sh script, modify ./install.sh file like below.
...
# configure zsh
chmod 755 ./zsh/install.sh
./zsh/install.sh
VSCode settings
Create ./vscode/ folder to manage VSCode installation and settings, and create ./vscode/install.sh file.
Add the command below to install and open VSCode.
# !/bin/bash
brew cask install visual-studio-code

sudo xattr -dr com.apple.quarantine /Applications/Visual\ Studio\ Code.app
And then, to install VSCode Extention, add the command like below.
...
# install vscode extensions
code --install-extension AlanWalk.markdown-toc
code --install-extension christian-kohler.npm-intellisense
code --install-extension christian-kohler.path-intellisense
code --install-extension CoenraadS.bracket-pair-colorizer
code --install-extension DavidAnson.vscode-markdownlint
code --install-extension dzannotti.vscode-babel-coloring
code --install-extension esbenp.prettier-vscode
code --install-extension felixfbecker.php-intellisense
code --install-extension fterrag.vscode-php-cs-fixer
code --install-extension gencer.html-slim-scss-css-class-completion
code --install-extension jcbuisson.vue
code --install-extension leizongmin.node-module-intellisense
code --install-extension mf.vscode-styled-components
code --install-extension ms-python.python
code --install-extension ms-vscode.vscode-typescript-tslint-plugin
code --install-extension msjsdiag.debugger-for-chrome
code --install-extension redhat.vscode-yaml
code --install-extension RoscoP.ActiveFileInStatusBar
code --install-extension shardulm94.trailing-spaces
code --install-extension vscode-icons-team.vscode-icons
To install VSCode extension, we need to execute the command like code --install-extension [extension id]. You can find extension id on the right of the extension name in the extension detail page like below.

Lastly, copy the current VSCode configuration to ./vscode/ folder. VSCode configuration is on the folder below.
~/Library/Application\ Support/Code/User/settings.json
To configure copied settings.json on new Mac, add the command below to ./vscode/install.sh file.
...
cp ./vscode/settings.json ~/Library/Application\ Support/Code/User/settings.json
The completed ./vscode/install.sh is as below.
# !/bin/bash
brew cask install visual-studio-code

sudo xattr -dr com.apple.quarantine /Applications/Visual\ Studio\ Code.app

# install vscode extensions
code --install-extension AlanWalk.markdown-toc
code --install-extension christian-kohler.npm-intellisense
code --install-extension christian-kohler.path-intellisense
code --install-extension CoenraadS.bracket-pair-colorizer
code --install-extension DavidAnson.vscode-markdownlint
code --install-extension dzannotti.vscode-babel-coloring
code --install-extension esbenp.prettier-vscode
code --install-extension felixfbecker.php-intellisense
code --install-extension fterrag.vscode-php-cs-fixer
code --install-extension gencer.html-slim-scss-css-class-completion
code --install-extension jcbuisson.vue
code --install-extension leizongmin.node-module-intellisense
code --install-extension mf.vscode-styled-components
code --install-extension ms-python.python
code --install-extension ms-vscode.vscode-typescript-tslint-plugin
code --install-extension msjsdiag.debugger-for-chrome
code --install-extension redhat.vscode-yaml
code --install-extension RoscoP.ActiveFileInStatusBar
code --install-extension shardulm94.trailing-spaces
code --install-extension vscode-icons-team.vscode-icons

# copy vscode settings
cp ./vscode/settings.json ~/Library/Application\ Support/Code/User/settings.json
Add the command below to ./install.sh to execute ./vscode/install.sh script.
...
# configure VSCode
chmod 755 ./vscode/install.sh
./vscode/install.sh
iTerm2
Create ./iterm2/ folder to manage iTerm2 installation and configuration. And open the current iTerm2.
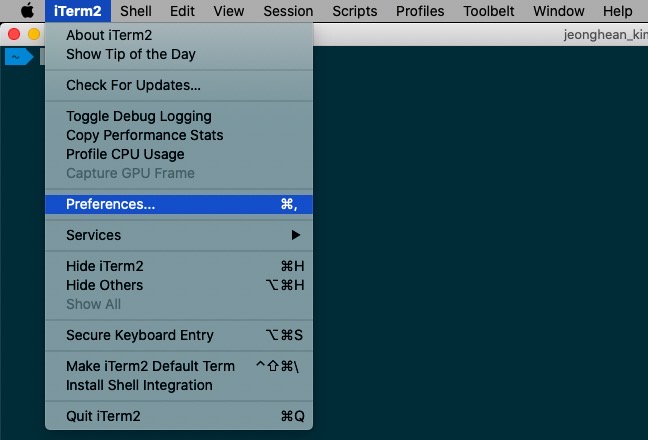
To export the current iTerm2 configuration, click Preferences... > General > Preferences.
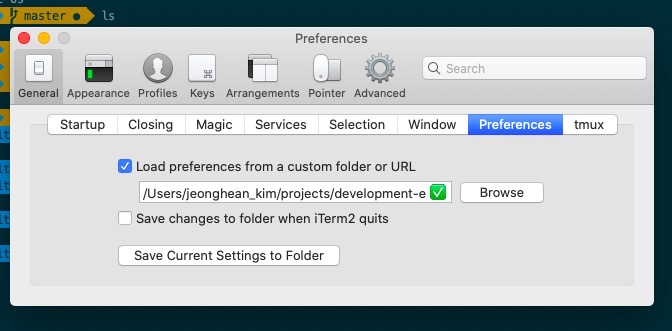
Check Load preferences from a custom folder or URL like above, and click Browse button and set ./iterm2/ folder created above.
After setting, click Save Current Settings to Folder button to export current iTerm2 configuration.
After than, you can see ./iterm2/com.googlecode.iterm2.plist file is created.
Now, create ./iterm2/install.sh file and modify it like below.
# !/bin/bash

cp ./iterm2/com.googlecode.iterm2.plist ~/Library/Application\ Support/iTerm2/DynamicProfiles/

chsh -s /bin/zsh
The commands above are to add com.googlecode.iterm2.plist file copy command we’ve created above, and the command that set zsh default shell.
Add the command below to .install.sh file.
...
# copy iterm2 configuration
chmod 755 ./iterm2/install.sh
./iterm2/install.sh
jekyll configuration
I use jekyll to make the blog. To install jekyll, create ./jekyll/install.sh file and modify it like below.
# !/bin/bash

sudo gem install bundler jekyll
And add the command below to ./install.sh to execute the script above.
...
# install jekyll
chmod 755 ./jekyll/install.sh
./jekyll/install.sh
react-native environment
I use React Native for the app development. To install React Native, create ./react-native/install.sh file and modify it like below.
# !/bin/bash
npm install -g react-native-cli

npm config set save-exact=true

sudo gem install cocoapods
- npm install -g react-native-cli: install react-native-cli
- npm config set save-exact=true: this command is the npm nodule version fixed in package.json when they are installed to reduce react-native version problems.
- sudo gem install cocoapods: instlal Cocoapods to use pod in iOS
Open ./install.sh file and modify it like below.
...
# install react-native
chmod 755 ./react-native/install.sh
./react-native/install.sh
python development environment
Create ./python/install.sh file and modify it like below to install libraries for development.
# !/bin/bash
pip install virtualenv pylint autopep8
Add the command below to ./install.sh to execute it.
...
# install python3
chmod 755 ./python/install.sh
./python/install.sh
Xcode
Lastly, create ./xcode/install.sh to install `Xcode.
# !/bin/bash

mas install 497799835

sudo xcodebuild -license accept
- mas install 497799835: use Homebrew mas to isntall Xcode.
- sudo xcodebuild -license accept: accept Xcode license via command.
Add the command below to ./isntall.sh to execute the script.
...
# install xcode
chmod 755 ./xcode/install.sh
./xcode/install.sh
Save the development environment(Github)
Save these development environment settings on Github. You can see all my settings above on the link below.
Reset Mac and install latest OS
Reboot Mac to reset and install latest OS. When rebooting, press Command + Option + r to use Internet recovery. I fyou want to know more details, see the link below.
Configure the development environment on Mac
After recovery, open Terminal and execute the command below to check Git version.
git --version
Git is not installed yet, so you can see the dialog about it. Install Git via the dialog.
After installing Git, execute Git clone command below to clone the development environment script we’ve made.
git clone https://github.com/dev-yakuza/development-environment-for-mac-os.git
After cloning, execute the command below to configure Mac automatically.
./development-environment-for-mac-os/install.sh
When the script is executed, some script is required the administrator privilege, so you should enter the administrator password.
Configure iTerm2 manually
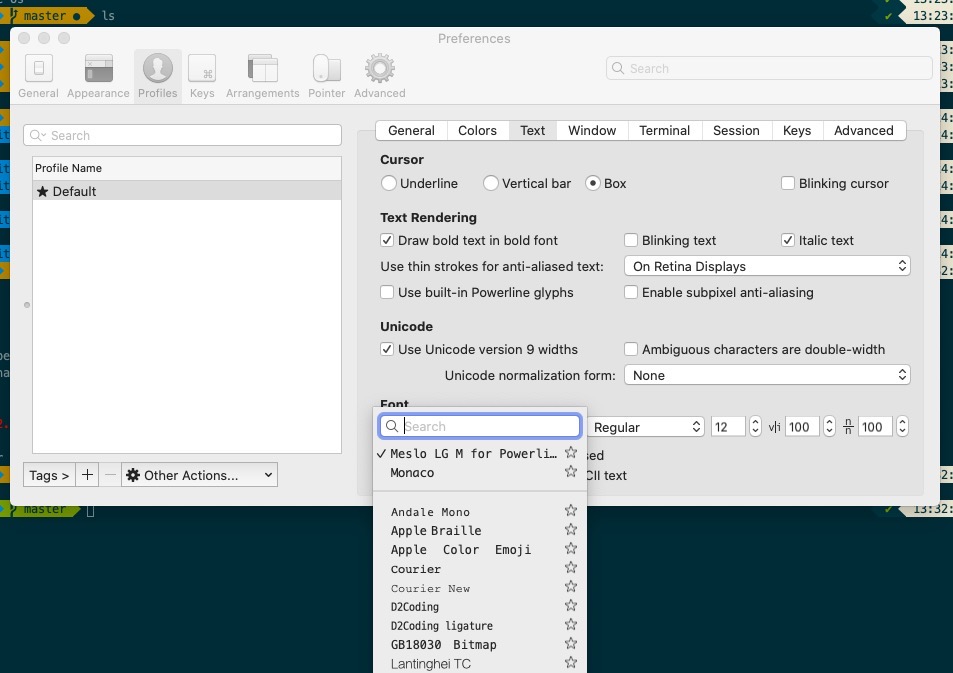
Unfortunately, I don’t find to configure iTerm2 font and theme automatically. So, we need to configure iTerm2 font and theme manually like below.
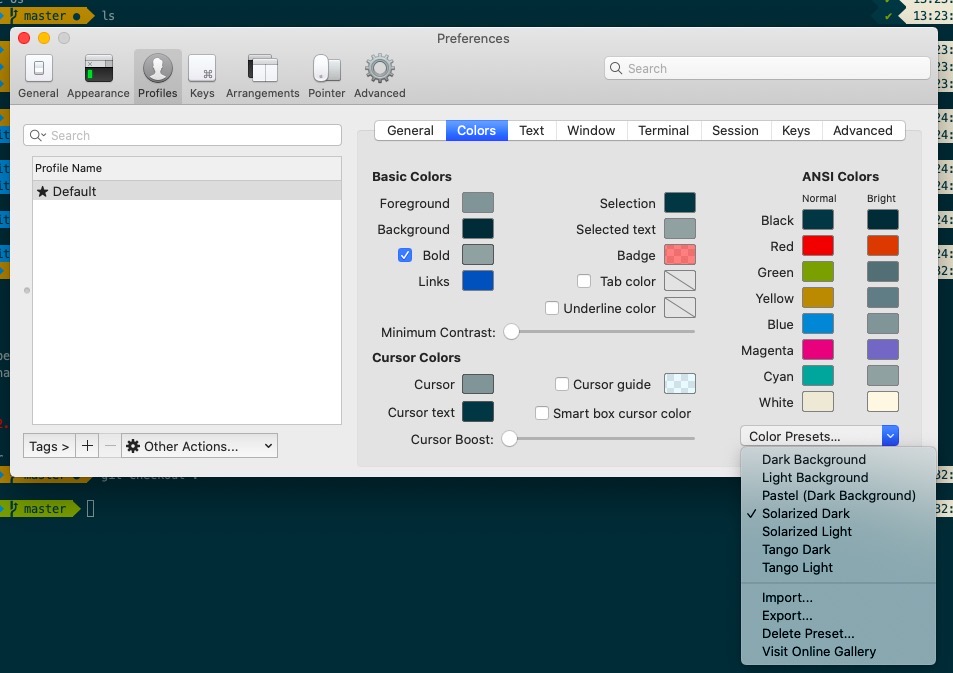
Completed
When I updated new Mac OS Catalina, I needed to configure the development environment from scratch. When I’ve configured the development environment, I’ve set them manually one by one. So, I wrote this blog post for automatical configuration.
Now, I can easily configure Mac with Homebrew and Shell script. Now, let’s make your own Brewfile and Shell script for configuring the development environment automatically on your Mac!
Was my blog helpful? Please leave a comment at the bottom. it will be a great help to me!
App promotion
Deku.Deku created the applications with Flutter.If you have interested, please try to download them for free.


