Content
Outline
react-navigation had big changes in V5. V4 was similar with V3, but V5 is like another Navigation. SO, I’m writing a blog post about react-navigation V5.
If you want to know previous versions(V3, V4), see the link below.
Below is react-navigation V5 official site.
- Official site: https://reactnavigation.org
Let’s see how to use react-navigation V5!
Create react-native project
The source code in this blog post is applied typescript and styled-components. If you want to know how to install typescript and styled-components, see the links below.
Install react-navigation V5
Execute the command below to install react-navigation v5.
npm install --save @react-navigation/native
Also, execute the command below to install required libraries for react-navigation V5.
npm install --save react-native-reanimated react-native-gesture-handler react-native-screens react-native-safe-area-context @react-native-community/masked-view
After installing, go to iOS folder and execute the command below.
# cd ios
pod install
Install additional Navigations
From react-navigation V4, we need to install Navigations to use it. V5 is same. We need to install additional navigaiton libraries to use Navigations.
Stack Navigation
Stack Navigation is like below.

[picture: reactnavigation.org Official site]
Execute the command below to install an additional library to use Stack Navigation.
npm install --save @react-navigation/stack
Drawer Navigation
Drawer Navigation is mainly used for Menu. Normally, Users swipe the screen to show Drawer Navigation.
[picture: reactnavigation.org Official site]
Execute the command below to install an additional library to use Drawer Navigation.
npm install --save @react-navigation/drawer
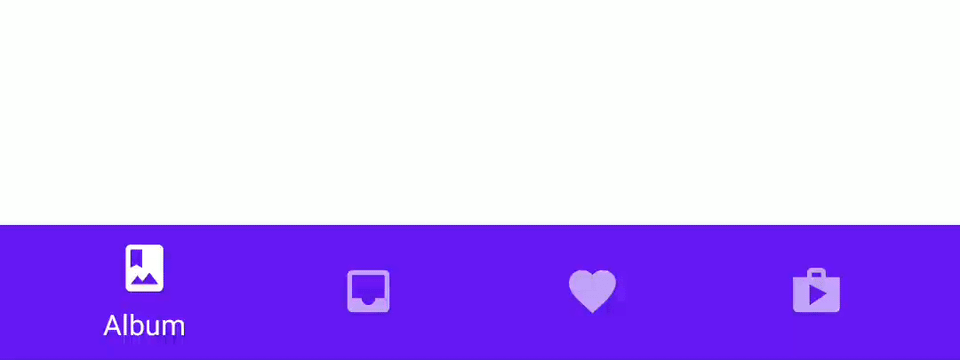
Bottom Tab Navigation
Bottom Tab Navigation looks like below.

[Picture: reactnavigation.org Official site]
Execute the command below to install an additional library to use Bottom Tab Navigation.
npm install --save @react-navigation/bottom-tabs
Material Bottom Tab Navigation
Material Bottom Tab Navigation is Bottom Tab Navigation with Google Material design like below.
[picture: reactnavigation.org Official site]
Execute the command below to install an additional library to use Material Bottom Tab Navigation.
npm install --save @react-navigation/material-bottom-tabs react-native-paper
And we need to install react-native-vector-icons library to use this Navigation. see the link below to install react-native-vector-icons.
Material Top Tab Navigation
Material Top Tab Navigation is Top Tab navigation with Google Material design like below.

[그림: reactnavigation.org 공식 홈페이지]
Execute the command below to isntall an additional library to use Material Top Tab Navigation.
npm install -- save @react-navigation/material-top-tabs react-native-tab-view@^2.16.0
How to use
There are details about how to use react-navigation in Official site. You can see the details on the link below.
- Official site: https://reactnavigation.org/docs
I’ve made a repository by referrering the official site contents. If you see the repository before making applications, it helps you think about a navigation structure.
- react-navigation-exercise V5: https://github.com/dev-yakuza/react-navigation-v5-exercise
In below, I will introduce how to implement the navigation in the repository.
react-native-gesture-handler
To use react-navigation, we need to import react-native-gesture-handler. Open index.js or App.js file(top parenet component of react-navigation), and modify it like below.
import 'react-native-gesture-handler';
...
NavigationContainer
In V4, we needed to use createAppContainer in the last of the module to use Navigations.
import {createAppContainer} from 'react-navigation';
...
export default createAppContainer(
  ...
);
In V5, we need to use NavigationContainer in the last of the module like V4.
import React from 'react';
import {NavigationContainer} from '@react-navigation/native';
...
export default () => {
  return (
    <NavigationContainer>
      ...
    </NavigationContainer>
  );
};
Did you feel already what different is? The previous react-navigation is like a configuration. V5 is like using React Components.
Auth process
In V4, react-navigation provides createSwitchNavigator to process the Auth parts.
import {createSwitchNavigator, createAppContainer} from 'react-navigation';
...
import AuthLoading from './AuthLoading';
import Auth from './Auth';
...
export default createAppContainer(
  createSwitchNavigator(
    {
      AuthLoading,
      Auth,
      MainNavi,
    },
    {
      initialRouteName: 'AuthLoading',
    },
  ),
);
We can use createSwitchNavigator like above. AuthLoading component checks the user already logged in or not, If not logged in, show Auth screen, If logged in, show MainNavi screen.
In V5, createSwitchNavigator does not exist, so If you want to implement Auth process like above, you should make it on the navigation.
import React, {useContext} from 'react';
import {NavigationContainer} from '@react-navigation/native';
...
import {UserContext} from '~/Context/User';
...
export default () => {
  const {userInfo} = useContext<IUserContext>(UserContext);

  return (
    <NavigationContainer>
      {userInfo ? <MainNavi /> : <LoginStackNavi />}
    </NavigationContainer>
  );
};
In V5, createSwitchNavigator is gone, but V5 is like React components unlike V4. So we can implement that Navigation component checks the login status and displays the screen depends on the status.
You can see the details about this in the official site, too.
- Official site: react-navigation - Auth flow
How to use Stack Navigation
In react-navigation V4, you used Stack Navigation like below.
...
import {createStackNavigator} from 'react-navigation-stack';
...
const MainNavi = createStackNavigator({
  MainTab: {
    screen: MainTab,
    navigationOptions: ({navigation}) => ({
      header: null,
    }),
  },
  FullDetail,
});
...
In react-navigation V5, you can use Stack Navigation like below.
...
import {
  createStackNavigator,
} from '@react-navigation/stack';
...
const Stack = createStackNavigator();
...
const LoginStackNavi = () => {
  return (
    <Stack.Navigator
      screenOptions={{
        headerStyle: {
          backgroundColor: '#f4511e',
        },
        headerTintColor: '#fff',
        headerTitleStyle: {
          fontWeight: 'bold',
        },
      }}>
      <Stack.Screen
        name="SignIn"
        component={SignIn}
        options={{
          headerShown: false,
        }}
      />
      <Stack.Screen
        name="SignUp"
        component={SignUp}
        options={{headerBackTitleVisible: false}}
      />
      <Stack.Screen name="ResetPassword" component={ResetPassword} />
    </Stack.Navigator>
  );
};
In react-navigation V5, If you want to apply the properties for the common header, you can use screenOptions in Stack.Navigator.
If you want to set the header properties to the specific screen, you can use options in Stack.Screen.
The example above includes to hide Header Bar by using headerShown in options.
<Stack.Screen
  name="SignIn"
  component={SignIn}
  options={{
    headerShown: false,
  }}
/>
Also, it includes to hide Back Button title by using headerBackTitleVisible in options.
<Stack.Screen
  name="SignUp"
  component={SignUp}
  options={{headerBackTitleVisible: false}}
/>
How to use Drawer Navigation
In react-navigation V5, you can implement Drawer Navigation like below.
...
import {
  createDrawerNavigator,
  DrawerContentScrollView,
  DrawerItemList,
  DrawerItem,
  DrawerContentComponentProps,
  DrawerContentOptions,
  DrawerNavigationProp,
} from '@react-navigation/drawer';
...
const Drawer = createDrawerNavigator();
...
const CustomDrawerContent = (
  props: DrawerContentComponentProps<DrawerContentOptions>,
  logout: () => void,
) => {
  return (
    <DrawerContentScrollView {...props}>
      <DrawerItemList {...props} />
      <DrawerItem label="Logout" onPress={() => logout()} />
    </DrawerContentScrollView>
  );
};
const DrawNavi = () => {
  const {logout} = useContext<IUserContext>(UserContext);

  return (
    <Drawer.Navigator
      drawerContent={props => CustomDrawerContent(props, logout)}>
      <Drawer.Screen name="TabNavi" component={TabNavi} />
      <Drawer.Screen name="MaterialTabNavi" component={MaterialTabNavi} />
      <Drawer.Screen
        name="MaterialTopTabNaviStackNavi"
        component={MaterialTopTabNaviStackNavi}
      />
    </Drawer.Navigator>
  );
};
...
This example is a little bit complicated because of Logout feature. Except for the logout feature, it looks like below.
...
import {
  createDrawerNavigator,
} from '@react-navigation/drawer';
...
const Drawer = createDrawerNavigator();
...
const DrawNavi = () => {
  return (
    <Drawer.Navigator>
      <Drawer.Screen name="TabNavi" component={TabNavi} />
      <Drawer.Screen name="MaterialTabNavi" component={MaterialTabNavi} />
      <Drawer.Screen
        name="MaterialTopTabNaviStackNavi"
        component={MaterialTopTabNaviStackNavi}
      />
    </Drawer.Navigator>
  );
};
...
It is very similar to Stack Navigation. The example above is to add Logout menu to Drawer Navigation and press it to logout, so it became complicated.
How to use Bottom Tab Navigation
In react-navigation V5, you can implement Bottom Tab Navigation.
...
import {createBottomTabNavigator} from '@react-navigation/bottom-tabs';
import Icon from 'react-native-vector-icons/MaterialIcons';
...
const Tab = createBottomTabNavigator();
...
const TabNavi = () => {
  return (
    <Tab.Navigator>
      <Tab.Screen
        name="TabFirstStackNavi"
        component={TabFirstStackNavi}
        options={{
          tabBarLabel: 'Frist',
          tabBarIcon: ({color}) => <Icon name="home" color={color} size={26} />,
        }}
      />
      <Tab.Screen
        name="TabSecond"
        component={TabSecond}
        options={{
          tabBarLabel: 'Second',
          tabBarIcon: ({color}) => (
            <Icon name="people" color={color} size={26} />
          ),
        }}
      />
      <Tab.Screen
        name="TabThird"
        component={TabThird}
        options={{
          tabBarLabel: 'Third',
          tabBarIcon: ({color}) => (
            <Icon name="message" color={color} size={26} />
          ),
        }}
      />
      <Tab.Screen
        name="TabFourth"
        component={TabFourth}
        options={{
          tabBarLabel: 'Fourth',
          tabBarIcon: ({color}) => (
            <Icon name="settings" color={color} size={26} />
          ),
        }}
      />
    </Tab.Navigator>
  );
};
...
In the example above, I used options in Tab.Screen to show Label and Icon.
<Tab.Screen
  ...
  options={{
    tabBarLabel: 'Fourth',
    tabBarIcon: ({color}) => (
      <Icon name="settings" color={color} size={26} />
    ),
  }}
/>
{% include in-feed-ads.html %}
How to use Material Bottom Tab Navigation
In react-navigation V5, you can implement Bottom Tab Navigation.
...
import {createMaterialBottomTabNavigator} from '@react-navigation/material-bottom-tabs';
import Icon from 'react-native-vector-icons/MaterialIcons';
...
const MaterialTab = createMaterialBottomTabNavigator();
...
const MaterialTabNavi = () => {
  return (
    <MaterialTab.Navigator>
      <MaterialTab.Screen
        name="TabFirstStackNavi"
        component={TabFirstStackNavi}
        options={{
          tabBarColor: '#281b39',
          tabBarLabel: 'Frist',
          tabBarIcon: ({color}) => <Icon name="home" color={color} size={26} />,
        }}
      />
      <MaterialTab.Screen
        name="TabSecond"
        component={TabSecond}
        options={{
          tabBarColor: '#0e141d',
          tabBarLabel: 'Second',
          tabBarIcon: ({color}) => (
            <Icon name="people" color={color} size={26} />
          ),
        }}
      />
      <MaterialTab.Screen
        name="TabThird"
        component={TabThird}
        options={{
          tabBarColor: '#E64A19',
          tabBarLabel: 'Third',
          tabBarIcon: ({color}) => (
            <Icon name="message" color={color} size={26} />
          ),
        }}
      />
      <MaterialTab.Screen
        name="TabFourth"
        component={TabFourth}
        options={{
          tabBarColor: '#524365',
          tabBarLabel: 'Fourth',
          tabBarIcon: ({color}) => (
            <Icon name="settings" color={color} size={26} />
          ),
        }}
      />
    </MaterialTab.Navigator>
  );
};
You should set Tab Bar icon to use Material Bottom Tab Navigation.
<MaterialTab.Screen
  ...
  options={{
    ...
    tabBarIcon: ({color}) => (
      <Icon name="settings" color={color} size={26} />
    ),
  }}
/>
Also, you can set tabBarColor to change the tab bar color by touching the tab.
<MaterialTab.Screen
  ...
  options={{
    ...
    tabBarColor: '#524365',
    ...
  }}
/>
tabBarIcon option is the required option, but tabBarColor is you can implement only you need.
How to useMaterial Top Tab Navigation
In react-navigation V5, you can implement Material Top Tab Navigation like below.
...
import {createMaterialTopTabNavigator} from '@react-navigation/material-top-tabs';
...
const MaterailTopTab = createMaterialTopTabNavigator();
...
const MaterialTopTabNavi = () => {
  return (
    <MaterailTopTab.Navigator>
      <MaterailTopTab.Screen name="TabFirst" component={TabFirst} />
      <MaterailTopTab.Screen name="TabSecond" component={TabSecond} />
      <MaterailTopTab.Screen name="TabThird" component={TabThird} />
      <MaterailTopTab.Screen name="TabFourth" component={TabFourth} />
    </MaterailTopTab.Navigator>
  );
};
...
const MaterialTopTabNaviStackNavi = ({navigation}: DrawerProp) => {
  return (
    <Stack.Navigator
      screenOptions={{
        headerLeft: (props: StackHeaderLeftButtonProps) => (
          <IconButton
            iconName="menu"
            onPress={() => navigation.openDrawer()}
            color="black"
          />
        ),
      }}>
      <Stack.Screen name="MaterialTopTabNavi" component={MaterialTopTabNavi} />
    </Stack.Navigator>
  );
};
...
Simply, We can use Material Top Tab Navigation like below.
const MaterialTopTabNavi = () => {
  return (
    <MaterailTopTab.Navigator>
      <MaterailTopTab.Screen name="TabFirst" component={TabFirst} />
      <MaterailTopTab.Screen name="TabSecond" component={TabSecond} />
      <MaterailTopTab.Screen name="TabThird" component={TabThird} />
      <MaterailTopTab.Screen name="TabFourth" component={TabFourth} />
    </MaterailTopTab.Navigator>
  );
};
However, the above is not shown up perfectly in Notch Design.

To solve this problem, I recommend you wrap it by Stack Navigation like below.
...
const MaterialTopTabNavi = () => {
  return (
    <MaterailTopTab.Navigator>
      <MaterailTopTab.Screen name="TabFirst" component={TabFirst} />
      <MaterailTopTab.Screen name="TabSecond" component={TabSecond} />
      <MaterailTopTab.Screen name="TabThird" component={TabThird} />
      <MaterailTopTab.Screen name="TabFourth" component={TabFourth} />
    </MaterailTopTab.Navigator>
  );
};
...
const MaterialTopTabNaviStackNavi = ({navigation}: DrawerProp) => {
  return (
    <Stack.Navigator
      screenOptions={{
        headerLeft: (props: StackHeaderLeftButtonProps) => (
          <IconButton
            iconName="menu"
            onPress={() => navigation.openDrawer()}
            color="black"
          />
        ),
      }}>
      <Stack.Screen name="MaterialTopTabNavi" component={MaterialTopTabNavi} />
    </Stack.Navigator>
  );
};
...
If you warp with Stack Navigation, you can see the result like below.

Drawer Open
If you only use Drawer Navigation, you can see the result like below.
[picture: reactnavigation.org Official site]
To open Drawer navigaiton, you need to swipe left to right.
However, we implement it by adding a menu icon on the left of the Navigation Header and touching it to show Drawer Navigation, normally.
So, I’ve implemented it by adding the menu icon to the left of the navigation header and calling openDrawer function if it is touched.
...
import {
  ...
  DrawerNavigationProp,
} from '@react-navigation/drawer';
...
type TypeDrawerProp = DrawerNavigationProp<
  {
    TabNavi: undefined;
    MaterialTabNavi: undefined;
    MaterialTopTabNaviStackNavi: undefined;
    Logout: undefined;
  },
  'TabNavi'
>;
interface DrawerProp {
  navigation: TypeDrawerProp;
}
...
const MaterialTopTabNaviStackNavi = ({navigation}: DrawerProp) => {
  return (
    <Stack.Navigator
      screenOptions={{
        headerLeft: (props: StackHeaderLeftButtonProps) => (
          <IconButton
            iconName="menu"
            onPress={() => navigation.openDrawer()}
            color="black"
          />
        ),
      }}>
      <Stack.Screen name="MaterialTopTabNavi" component={MaterialTopTabNavi} />
    </Stack.Navigator>
  );
};
DrawerActions
In the example above, if the screen is under Drawer Navigation directly, you can open the Drawer using the navigation Props. However, like below, if the screen is not under Drawer Navigation directly, you can not open and close the Drawer navigation.
...
const MainTabs = () => {
  return (
    <BottomTab.Navigator tabBarOptions={{activeTintColor: 'black'}}>
      <BottomTab.Screen name="MyFeed" component={MyFeed}/>
      <BottomTab.Screen name="Feeds" component={Feeds}/>
      <BottomTab.Screen name="Upload" component={Upload}/>
      <BottomTab.Screen name="Notification" component={Notification}/>
      <BottomTab.Screen name="Profile" component={Profile}/>
    </BottomTab.Navigator>
  );
};
...
const MainNavigator = () => {
  return (
    <Drawer.Navigator
      drawerPosition="right"
      drawerType="slide"
      drawerContent={props => <CustomDrawer props={props} />}>
      <Drawer.Screen name="MainTabs" component={MainTabs} />
    </Drawer.Navigator>
  );
};
Because, The screen can only get the parenet Navigation Props. In the example above, the parent of Profile screen in MainTab is Bottom Tab navigation not Drawer Navigation. In this case, we can not use navigation.openDrawer().
In this case, we can use DrawerActions.
If the screen is not directly under Drawer Navigation, but is the children of Drawer Navigation, You can open the Drawer like below.
...
import {DrawerActions} from '@react-navigation/native';
...
type NavigationProp = StackNavigationProp<ProfileTabParamList, 'Profile'>;
interface Props {
  navigation: NavigationProp;
}

const Profile = ({navigation}: Props) => {
  return (
    <ScrollView>
      ...
      <IconButton
        iconName="menu"
        onPress={() => navigation.dispatch(DrawerActions.openDrawer())}
      />
      ...
    </ScrollView>
  );
});

export default Profile;
You can open the Drawer Navigation by using navigation.dispatch(DrawerActions.openDrawer()). You can also use the functions below.
navigation.dispatch(DrawerActions.openDrawer());
navigation.dispatch(DrawerActions.closeDrawer());
navigation.dispatch(DrawerActions.toggleDrawer());
setParams / getParams
In react-navigation V4, you used the code below to exchange Data between the screens.
...
navigation.setParams({
  showSearch: false,
});
...
const showSearch = navigation.getParam('showSearch');
In react-navigation V5, you can use setParams, but you can not use getParams.
navigation.setParams({
  showSearch: false,
});
In react-navigation V5, you can use route.params instead of getParams.
...
import { RouteProp } from '@react-navigation/native';
...

type ProfileScreenRouteProp = RouteProp<MovieNaviParamList, 'MovieDetail'>;
interface Props {
  route: ProfileScreenRouteProp;
}

const MovieDetail = ({ route }: Props) => {
  const { id } = route.params;
  ...
});

export default MovieDetail;
It looks a little bit complicated because of Typescript.
const MovieDetail = ({ route, navigation }) => {
  const { id } = route.params;
  ...
});
It looks like above. You can use route Props that comes with navigation Props.
Typescript
Let’s see how to use Typescript in react-navigation v5.
navigation
To navigate the screen, you use the source code with navigation Props like below.
const Feeds = ({navigation}: Props) => {
  ...
  navigation.navigate('FeedListOnly');
  ...
});
For this, you should write Typescript like below.
...
import {StackNavigationProp} from '@react-navigation/stack';
...
// Stack Navigation
type NavigationProp = StackNavigationProp<FeedsTabParamList, 'Feeds'>;
interface Props {
  navigation: NavigationProp;
}

const Feeds = ({navigation}: Props) => {
  ...
  navigation.navigate('FeedListOnly');
  ...
});
In above, FeedsTabParamList is a common Type, so make @types/index.d.ts file and modify it like below.
type FeedsTabParamList = {
  Feeds: undefined;
  FeedListOnly: undefined;
};
This Stack Navigation has Feeds and FeedListOnly screens. In this case, it doesn’t have the parameters to navigate the screen, so set undefined.
If the screen need the parameters,
type FeedsTabParamList = {
  Feeds: undefined;
  FeedListOnly: {
    id: number;
  };
};
Define the type like above,
const Feeds = ({navigation}: Props) => {
  ...
  navigation.navigate('FeedListOnly', {
    id: 1,
  });
  ...
});
And navigate the screen with the parameter. It looks very complicated but it is for checking types correctly.
In above, I introduced Stack Navigation, and you can also use each Navigation Props like below.
import {BottomTabNavigationProp} from '@react-navigation/bottom-tabs';
import {DrawerNavigationProp} from '@react-navigation/drawer';
import {MaterialBottomTabNavigationProp} from '@react-navigation/material-bottom-tabs';
import {MaterialTopTabBarProps} from '@react-navigation/material-top-tabs';
The usage is the same as Stack Navigation.
type NavigationProp = BottomTabNavigationProp<FeedsTabParamList, 'Feeds'>;
type NavigationProp = DrawerNavigationProp<FeedsTabParamList, 'Feeds'>;
type NavigationProp = MaterialBottomTabNavigationProp<FeedsTabParamList, 'Feeds'>;
type NavigationProp = MaterialTopTabBarProps<FeedsTabParamList, 'Feeds'>;
route
In above, you can use navigation.setParams to send tha data between the screens. At this time, you use route.params.
To use route Props, you use Typescript like below.
...
import { RouteProp } from '@react-navigation/native';
...
type ProfileScreenRouteProp = RouteProp<MovieNaviParamList, 'MovieDetail'>;
interface Props {
  route: ProfileScreenRouteProp;
}

const MovieDetail = ({ route }: Props) => {
  const { id } = route.params;
  ...
});

export default MovieDetail;
In here, MovieNaviParamList is also used for many screens, so make @types/index.d.ts file and modify it like below.
type MovieNaviParamList = {
  MovieHome: undefined;
  MovieDetail: {
    id: number;
  };
};
Completed
We’ve seen how to install react-navigation V5 and how to implement it. I was surprised by the differences between V4 and V5, but V5 looks like React Components, so I think it is more friendly to React development.
I think all previous features can be implemented. In the react-navigation V5 example, I’ve implemented the previous example of react-navigation V4. If you want to use react-navigation V5, see the example below first!
- react-navigation-exercise V5: https://github.com/dev-yakuza/react-navigation-v5-exercise
Reference
- Official site: react-navigation
Was my blog helpful? Please leave a comment at the bottom. it will be a great help to me!
App promotion
Deku.Deku created the applications with Flutter.If you have interested, please try to download them for free.