목차
개요
React Native에서 지도를 표시하고 현재 위치를 표시하는 방법에 대해서 알아보려고 합니다. React Native에서 지도를 다루기 위해서는 React Native 커뮤니케이션의 react-native-maps 라이브러리를 많이 사용합니다.
이번 블로그에서는 react-native-maps를 통해 React Native에 지도를 표시하고 현재 위치를 가져와 지도 위에 표시하는 방법에 대해서 알아봅니다.
이 블로그 포스트에서 소개 되는 소스코드는 github에서 확인할 수 있습니다.
- github: react-native-map-example
예제 소스코드는 아래에 내용이 적용되어 있으니, 궁금하신 분들은 아래에 내용도 참고하시기 바랍니다.
react-native-maps 설치
아래에 명령어를 사용하여 react-native-maps를 설치합니다.
npm install --save react-native-maps
라이브러리 연결
설치한 라이브러리를 React Native 프로젝트에 연결할 필요가 있습니다.
0.60 이상
아래에 명령어로 react-native-maps를 React Native 프로젝트에 연결합니다.
cd ios
pod install
cd ..
0.59 이하
아래에 명령어로 react-native-maps를 React Native 프로젝트에 연결합니다.
react-native link react-native-maps
수동 연결에 관해서는 공식 사이트를 참고하시기 바랍니다.
iOS에서 구글맵 사용 설정
0.60 버전에서 구글 맵을 사용하기 위해, ios/[project name]/AppDelegate.m 파일을 열고 아래와 같이 수정합니다.
#import <GoogleMaps/GoogleMaps.h>

@implementation AppDelegate
...

- (BOOL)application:(UIApplication *)application didFinishLaunchingWithOptions:(NSDictionary *)launchOptions
{
+  [GMSServices provideAPIKey:@"_YOUR_API_KEY_"]; // add this line using the api key obtained from Google Console
...
그리고 ios/Podfile을 열고 아래와 같이 수정합니다.
...
pod 'Folly', :podspec => '../node_modules/react-native/third-party-podspecs/Folly.podspec'

# react-native-maps dependencies
pod 'react-native-maps', path: '../node_modules/react-native-maps'
  pod 'react-native-google-maps', path: '../node_modules/react-native-maps'  # Remove this line if you don't want to support GoogleMaps on iOS
pod 'GoogleMaps'  # Remove this line if you don't want to support GoogleMaps on iOS
pod 'Google-Maps-iOS-Utils' # Remove this line if you don't want to support GoogleMaps on iOS

target 'ReactNativeMapExampleTests' do
...
마지막으로 아래에 명령어를 실행하여 iOS에 필요한 라이브러리를 설치합니다.
cd ios
pod install
cd ..
0.59 이하 버전을 사용하시는 분들은 공식 사이트를 참고하시기 바랍니다.
사용법
react-native-maps을 이용하여 지도를 표시하고 싶은 부분에 아래와 같이 수정합니다.
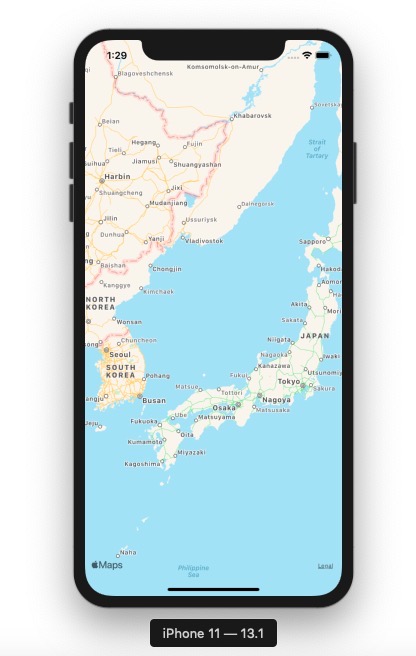
애플 맵
애플 맵을 사용하여 지도를 표시하기 위해서는 아래와 같이 수정합니다.
import React from 'react';
import Styled from 'styled-components/native';
import MapView from 'react-native-maps';

const Container = Styled.View`
    flex: 1;
`;

const AppleMap = () => {
  return (
    <Container>
      <MapView style={{flex: 1}} />
    </Container>
  );
};

export default AppleMap;
아래에 명령어로 React Native 프로젝트를 실행하면
npm run ios
# android
# npm run android
아래와 같은 결과 화면을 볼 수 있습니다.
구글 맵
구글 맵을 사용하기 위해서는 아래와 같이 수정합니다.
import React from 'react';
import Styled from 'styled-components/native';
import MapView, {PROVIDER_GOOGLE} from 'react-native-maps';

const Container = Styled.View`
    flex: 1;
`;

const GoogleMap = () => {
  return (
    <Container>
      <MapView style={{flex: 1}} provider={PROVIDER_GOOGLE} />
    </Container>
  );
};

export default GoogleMap;
아래에 명령어로 React Native 프로젝트를 실행하면
npm run ios
# android
# npm run android
아래와 같은 결과 화면을 볼 수 있습니다.
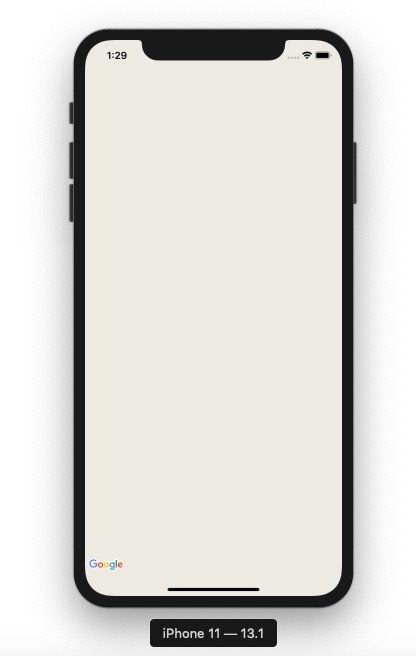
(여기 구글 맵이 표시되지 않는 이유는, 예제에 있는 provideAPIKey를 사용했기 때문입니다. 여러분이 정확한 provideAPIKey를 사용하신다면 구글 맵이 표시되는 것을 확인할 수 있습니다.)
지도의 초기 위치 설정
아래와 같이 수정하면, 지도의 초기 위치를 설정할 수 있습니다.
import React from 'react';
import Styled from 'styled-components/native';
import MapView from 'react-native-maps';

const Container = Styled.View`
    flex: 1;
`;

const InitialLocation = () => {
  return (
    <Container>
      <MapView
        style={{flex: 1}}
        initialRegion={{
          latitude: 37.78825,
          longitude: -122.4324,
          latitudeDelta: 0.0922,
          longitudeDelta: 0.0421,
        }}
      />
    </Container>
  );
};

export default InitialLocation;
지도의 마커(Marker) 표시
아래와 같이 수정하면, 지도위에 마커(Marker)를 표시할 수 있습니다.
import React from 'react';
import Styled from 'styled-components/native';
import MapView, {Marker} from 'react-native-maps';

const Container = Styled.View`
    flex: 1;
`;

const MarkerOnMap = () => {
  return (
    <Container>
      <MapView
        style={{flex: 1}}
        initialRegion={{
          latitude: 37.78825,
          longitude: -122.4324,
          latitudeDelta: 0.0922,
          longitudeDelta: 0.0421,
        }}>
        <Marker
          coordinate={{latitude: 37.78825, longitude: -122.4324}}
          title="this is a marker"
          description="this is a marker example"
        />
      </MapView>
    </Container>
  );
};

export default MarkerOnMap;
지도 위치 추적하기
MapView의 onRegionChange와 onRegionChangeComplete을 사용하면 지도의 위치가 변경된 것을 추적할 수 있습니다.
<MapView
  onRegionChange={region => {
    setLocation({
      latitude: region.latitude,
      longitude: region.longitude,
    });
  }}
  onRegionChangeComplete={region => {
    setLocation({
      latitude: region.latitude,
      longitude: region.longitude,
    });
  }}
>
아래의 소스코드는, 사용자가 지도의 초기 위치에서 다른 곳으로 이동할 때, 해당 위치를 추적(트래킹)하고 지도의 가운데에 마커를 찍는 방법입니다.
import React, {useState} from 'react';
import Styled from 'styled-components/native';
import MapView, {Marker} from 'react-native-maps';

const Container = Styled.View`
    flex: 1;
`;

interface IGeolocation {
  latitude: number;
  longitude: number;
}

const TrackingMapWithMarker = () => {
  const [location, setLocation] = useState<IGeolocation>({
    latitude: 37.78825,
    longitude: -122.4324,
  });
  return (
    <Container>
      <MapView
        style={{flex: 1}}
        initialRegion={{
          latitude: location.latitude,
          longitude: location.longitude,
          latitudeDelta: 0.0922,
          longitudeDelta: 0.0421,
        }}
        onRegionChange={region => {
          setLocation({
            latitude: region.latitude,
            longitude: region.longitude,
          });
        }}
        onRegionChangeComplete={region => {
          setLocation({
            latitude: region.latitude,
            longitude: region.longitude,
          });
        }}>
        <Marker
          coordinate={{
            latitude: location.latitude,
            longitude: location.longitude,
          }}
          title="this is a marker"
          description="this is a marker example"
        />
      </MapView>
    </Container>
  );
};

export default TrackingMapWithMarker;
사용자의 현재 위치 표시
사용자의 현재 위치를 표시하기 위해서는 사용자의 현재 위치를 가져올 필요가 있습니다. 사용자의 위치 정보를 가져오는 방법에 대해서는 아래에 블로그를 참고하시기 바랍니다.
이렇게 가져온 사용자 데이터를 표시하기 위해 아래에 소스코드를 이용합니다.
import React, {useState, useEffect} from 'react';
import Styled from 'styled-components/native';
import MapView, {Marker} from 'react-native-maps';
import Geolocation from 'react-native-geolocation-service';

const Container = Styled.View`
    flex: 1;
`;

interface ILocation {
  latitude: number;
  longitude: number;
}

const UserLocation = () => {
  const [location, setLocation] = useState<ILocation | undefined>(undefined);

  useEffect(() => {
    Geolocation.getCurrentPosition(
      position => {
        const {latitude, longitude} = position.coords;
        setLocation({
          latitude,
          longitude,
        });
      },
      error => {
        console.log(error.code, error.message);
      },
      {enableHighAccuracy: true, timeout: 15000, maximumAge: 10000},
    );
  }, []);
  return (
    <Container>
      {location && (
        <MapView
          style={{flex: 1}}
          initialRegion={{
            latitude: location.latitude,
            longitude: location.longitude,
            latitudeDelta: 0.0922,
            longitudeDelta: 0.0421,
          }}>
          <Marker
            coordinate={{
              latitude: location.latitude,
              longitude: location.longitude,
            }}
          />
        </MapView>
      )}
    </Container>
  );
};

export default UserLocation;
결과 화면은 아래와 같습니다.

사용자 위치 추적 표시
위치 정보 라이브러리인 react-native-geolocation-service를 사용하면, 사용자의 위치 정보를 추적할 수 있습니다. react-native-geolocation-service 라이브러리에 관해서는 아래에 링크를 참고하시기 바랍니다.
사용자 위치 정보를 추적하여 마커(Marker)로 표시하는 예제는 아래와 같습니다.
import React, {useState, useEffect} from 'react';
import Styled from 'styled-components/native';
import MapView, {Marker} from 'react-native-maps';
import Geolocation from 'react-native-geolocation-service';

const Container = Styled.View`
    flex: 1;
`;

interface ILocation {
  latitude: number;
  longitude: number;
}

const TrackUserLocation = () => {
  const [locations, setLocations] = useState<Array<ILocation>>([]);
  let _watchId: number;

  useEffect(() => {
    _watchId = Geolocation.watchPosition(
      position => {
        const {latitude, longitude} = position.coords;
        setLocations([...locations, {latitude, longitude}]);
      },
      error => {
        console.log(error);
      },
      {
        enableHighAccuracy: true,
        distanceFilter: 100,
        interval: 5000,
        fastestInterval: 2000,
      },
    );
  }, [locations]);

  useEffect(() => {
    return () => {
      if (_watchId !== null) {
        Geolocation.clearWatch(_watchId);
      }
    };
  }, []);

  return (
    <Container>
      {locations.length > 0 && (
        <MapView
          style={{flex: 1}}
          initialRegion={{
            latitude: locations[0].latitude,
            longitude: locations[0].longitude,
            latitudeDelta: 0.0922,
            longitudeDelta: 0.0421,
          }}>
          {locations.map((location: ILocation, index: number) => (
            <Marker
              key={`location-${index}`}
              coordinate={{
                latitude: location.latitude,
                longitude: location.longitude,
              }}
            />
          ))}
        </MapView>
      )}
    </Container>
  );
};

export default TrackUserLocation;
사용자 위치 추적의 결과 화면은 아래와 같습니다.

그밖에 기능들
지도의 초기 위치 설정 및 마커(Marker) 표시 이외에도 다양한 기능을 제공하고 있습니다. 아래에 링크를 통해 공식 사이트를 참고하시기 바랍니다.
- Rendering a Marker with a custom view
- Rendering a Marker with a custom image
- Rendering a custom Marker with a custom Callout
- Draggable Markers
- Using a custom Tile Overlay
- Overlaying other components on the map
- Customizing the map style
- Animated Region
- Animated Marker Position
- Take Snapshot of map
- Zoom to Specified Markers
네이버 지도
한국에서는 네이버 지도을 사용하고 싶은 분들이 많을거 같습니다. 여기서 소개한 라이브러리는 핸드폰에서 기본적으로 제공하는 지도(구글, 애플)를 사용합니다. 네이버 지도를 사용하고 싶은 분들은 아래에 라이브러리를 참고하시기 바랍니다.
완료
이것으로 React Native에서 지도를 사용하는 방법에 대해서 알아보았습니다. 이 라이브러리를 사용하면 지도 위에 마커뿐만 아니라, 폴리곤(Polygon)이나 폴리라인(Polyline)도 그릴 수 있습니다.
지도를 가지고 서비스를 준비중이신 분들은 이 라이브러리를 사용해 보시는 걸 추천합니다.
제 블로그가 도움이 되셨나요? 하단의 댓글을 달아주시면 저에게 큰 힘이 됩니다!
앱 홍보
Deku가 개발한 앱을 한번 사용해보세요.Deku가 개발한 앱은 Flutter로 개발되었습니다.관심있으신 분들은 앱을 다운로드하여 사용해 주시면 정말 감사하겠습니다.


![[심통]현장에서 바로 써먹는 리액트 with 타입스크립트 : 리액트와 스토리북으로 배우는 컴포넌트 주도 개발, 심통](https://img1c.coupangcdn.com/image/affiliate/banner/7cba8cb0601eebaf88a17a0c3cf65a63@2x.jpg)